РУССКИЙ:
1.Переносим все файлы и папки из папки RECOVERY_FAT_S9 на SD карту
2.Выключаем асик, переставляем джампера на контрольной плате и вставляем SD карту с записанным образом
3.Включаем контрольку c воткнутой SD картой и ждем 60 секунд до начала моргания светодиодов.
4.Выключаем асик , вытаскиваем флешку , переставляем джампера обратно и собираем асик
5.должна установиться vnish прошивка, если не помогло то требуется замена контрольной платы.
Архив для прошивки скачать
ENGLISH:
1. Transfer all files and folders from folder RECOVERY_FAT_S9 to the SD card
2. Turn off the power and rearrange the jumpers on the control board Initially and insert the SD card with the recorded files
5. Turn on the control board with an inserted SD card and wait 60 seconds before the LEDs blink.
6. Turn off the ASIC, pull out the USB flash drive, rearrange the jumpers
7. You will see vnish firmware, if this archive does not help, you need to replace the control board.
This method applies to the following situations:
- The miner is power-off in the upgrading process.
- The miner cannot start (cannot find IP).
- The miner can only use the default factory workers.
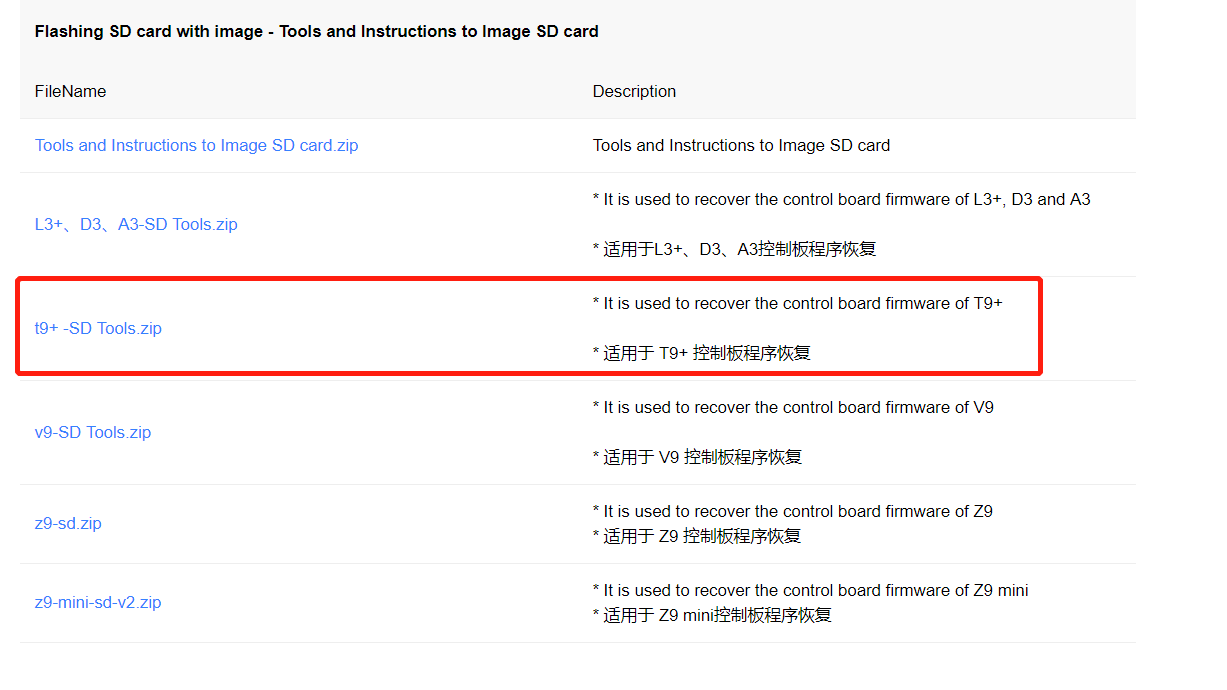
Tools required:
- The MicroSD card recommended capacity of less than 16GB. Larger capacity MicroSD cards are not recommended as they are very susceptible to errors.
- A computer running Windows XP or later
- Card reader
Software required:
We use the same image as T9+. Download Link: https://service.bitmain.com/support/download
On the left sidebar click "Flashing SD Card With Image>>Tools and Instructions to Image SD Card. Scroll up to the page and find t9+-SD Tools.zip. Load t9+-SD Tools.zip to your computer in a convenient file location.
Flashing Instructions :
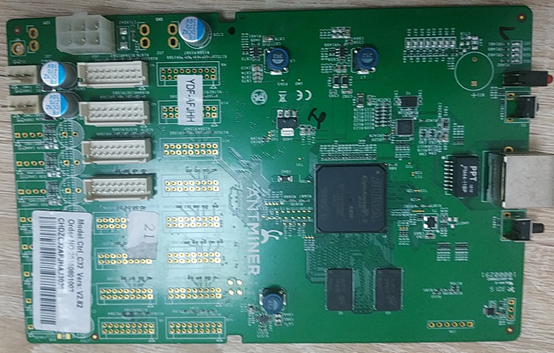
- Remove control board from miner assembly.
- Know your control board model and enable it to flash using the SD card. (See three types of control boards explanation below)
- Insert MicroSD card into computer and format to FAT32.
- Unzip the downloaded t9+-SD Tools.zip and copy the contents to the MicroSD card.
- Insert the MicroSD card into the card slot on the control board
- Power on the control board. Allow at least 90 seconds for the files to load automatically. When loaded, the red and green indicator lights on the control board will blink.
- Power on the control board and access the miner interface. Go to the Upgrade page and Uncheck “Keep Settings”. Flash the firmware and run the miner for 20 minutes.
Note that there are three types of control boards and each of them requires a different way to enable flashing.
o enable it to flash using SD card, you need to shift the JP4 jumper to the right as shown below.
After flashing completed, power off the control board and shift the JP4 jumper back to the original position.


2. Double boards such as model CRT0302.
To enable it to flash using SD card, you need to shortcircuit the AB as shown in the picture below.

3. Boards without SD card slot such as model CRT0301
It doesn't support SD card flashing.
Possible solutions to solve the flashing failure
1. Reformat the TF and make sure you've copied the correct firmware.
2. Press the TF softly to ensure it's well attached.
3. Dust and clean the TF.
4. Try with another good known TF.